![Brooks Hyperion Tempo Vs Ghost: Choose The Best One? [2024]](https://bestplaygear.com/wp-content/uploads/2024/01/Brooks-Hyperion-Vs-Brooks-Ghost-Comparison.webp)
Brooks Hyperion Tempo Vs Ghost: Choose The Best One? [2024]
Brooks Hyperion Tempo and Brooks Ghost are both popular running shoes. Luckily, comparing them is easy as they are intended for two very different types of runs.
Brooks Hyperion Tempo is a running shoe which is suited for runs like sprints, and shorter distances. Brooks Ghost is more suited for longer distances and easy runs. Also, the Brooks Hyperion Tempo is stiffer encouraging speed whereas Brooks Ghost has a softer and malleable sole which is more focused towards comfort.
Differences between Brooks Hyperion Tempo Vs Brooks Ghost
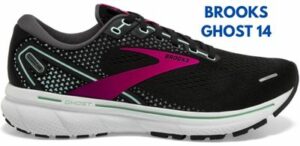
- Brooks Hyperion Tempo has a heel-to-toe drop of 8mm compared to as 12mm heel-to-drop of Brooks Ghost which is a bit too much for me.
- Brooks Hyperion Tempo is slightly lighter than Brooks Ghost. The weight of Brooks Hyperion Tempo is 7.1oz or 201.3g for women and 7.3oz/207g for men. The weight of Brooks Ghost is 9.1oz or 258.0g for women and 10.1oz or 286.3g for men.
- Brooks Hyperion Tempo has the newest cushion called DNA FLASH which is more suited for a more dynamic run. Brooks Ghost has the DNA LOFT V2 cushioning which is more suited for a cushy run.
- Brooks Hyperion Tempo has shoe sizes from 5.0 to 12.0 for women and 7.0 to 15.0 for men. In Brooks Ghost, you have a size range from 5.0 to 13.0 for women and 7.0 to 15.0 for men.
- Brooks Ghost has better arch support than Brooks Hyperion Tempo and can be more comfortable for people who have medium to high arch height.
- Brooks Hyperion Tempo has only one toe-box width available. Brooks Ghost has multiple toe-box widths available which makes it accessible to a wider group of runners.
- Brooks Ghost comes in a variety of versions like Brooks Ghost Max, Brooks Ghost GTX and the popular classic Brooks Ghost, plus the special editions. However, Brooks Hyperion Tempo comes only in the classic version and sometimes in special editions.
- This is the first generation of Brooks Hyperion Tempo whereas the current generation of Brooks Ghost is 15.
Brooks Ghost Vs Brooks Hyperion Tempo – Result

Last update on 2024-03-29 / Affiliate links / Images from Amazon Product Advertising API
Brooks Hyperion Tempo
Why did we pick this one?
- More lightweight.
- Excellent protection.
- New Dynamic cushioning.
- Integrated pull tab.
- Efficient running through energy saving.
Brooks Hyperion Tempo Vs Brooks Ghost – An Overview
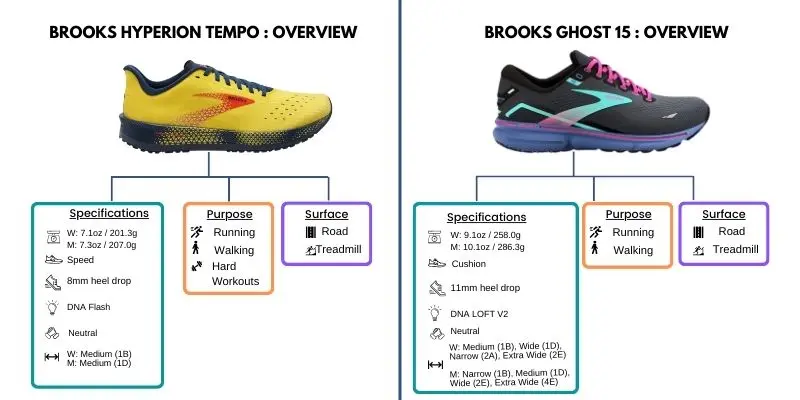
Both Brooks Hyperion Tempo and Brooks Ghost are neutral running shoes.
Although both of them belong to the same category of running shoes from a pronation perspective, they provide you with a completely different running experience.
Be it the toe box, the weight, the snappiness and the cushioning. Everything is different between these two shoes.
Let’s find out why…
Brooks Hyperion Tempo Vs Brooks Ghost – Features at a glance
| Brooks Hyperion Tempo | Brooks Ghost 15 | |
|---|---|---|
 |
 |
|
| Type | Neutral | Neutral |
| Heel-to-toe Drop | 8mm | 12mm |
| Weight |
7.1oz / 201.3g (Women) 7.3oz / 207.0g (Men) |
9.1oz / 258.0g (Women) 10.1oz / 286.3g (Men) |
| Arch Support | Flat, Medium | Medium, High |
| Midsole Type | DNA FLASH | DNA LOFT V2 |
| Technology | DNA FLASH, Stretch Woven Upper, | BioMoGo DNA Cushioning |
| Sizes |
5.0 – 12.0 (Women) 7.0 – 15.0 (Men) |
5.0 – 13.0 (Women) 7.0 – 15.0 (Men) |
| Width |
Normal (Women) Normal (Men) |
Normal, Wide D (Women) Normal, Wide 2E (Men) |
| Use | Long Distance, Treadmill, Road | Long Distance, Treadmill, Road |
| Awards and Certificates | None |
APMA School of Acceptance Runner’s World 2023 Shoe Awards
|
| Editor’s Rating | ||
Brooks Hyperion Tempo Vs Brooks Ghost – A head to head comparison
We have covered almost all the differences and similarities between Brooks Hyperion Tempo and Brooks Ghost in the above sections. However, for some of us, this may not be enough and may want to know more about both of these shoes.
Like, as how it feels to run in them, will these shoes cause shoe bites, how they are different technically and so forth.
In the following sections, we have provided you with some of these answers and a more detailed comparison of each part of these shoes.
Outsole
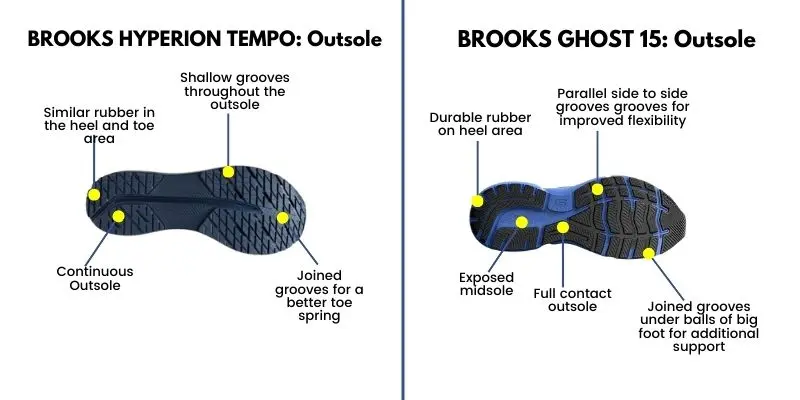
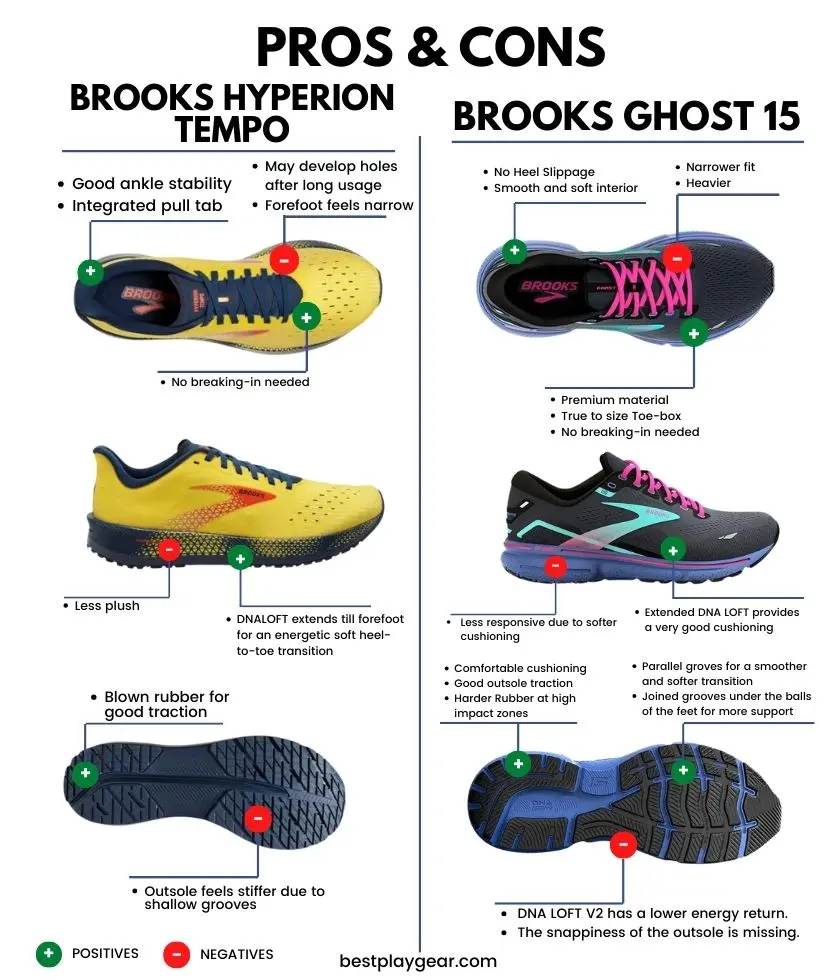
The outsole of Brooks Hyperion Tempo has blown rubber in the outsole. The outsole rubber spreads end to end of the shoe and doesn’t have deep grooves. However, the outsole has a crisscross pattern in the heel area and the forefoot. This provides an improved grip.
Also, there is a central groove that runs from almost the mid of the heel region to the mid of the forefoot. This provides a certain level of flexibility to this otherwise rigid shoe.
Having this kind of outsole improves the energy return as well and helps you to utilise the run energy better.
The outsole of Brooks Ghost has blown rubber. It is also not a single-layer rubber and more like pieces of it placed strategically throughout the sole. Brooks Ghost 15‘s outsole is very similar to its previous version and completely different from Brooks Hyperion Tempo.
In fact both the outsoles are almost polar opposite to each other in construction. The differences are so evident that you can understand most of the differences by only looking at them.
Apart from having pieces of blown rubber scattered from heel to toe, there are some parallel grooves that are present on the forefoot.
This improves the overall flexibility of the shoe and makes your landing softer. On the downside, the energy return of the shoe is as much as Hyperion Tempo as it lacks rigidity.
Both outsoles are good with grip and work well on dry and wet surfaces. However, these shoes are not meant for wet terrains and work only for may be a small wet patch.
Midsole
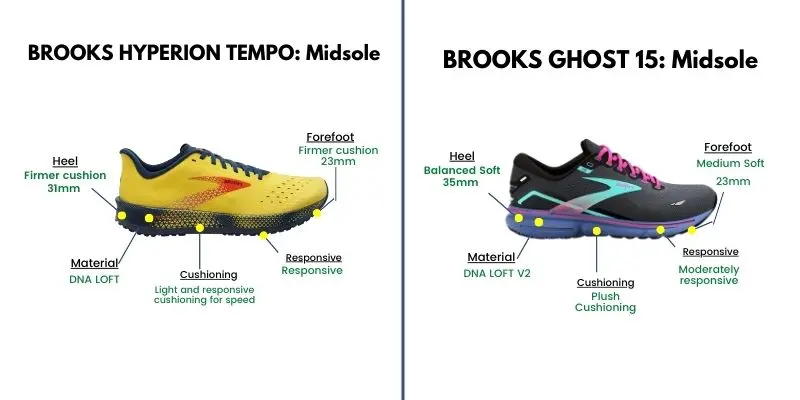
Not only the outsole, the midsole of both of these shoes are significantly different. Due to the kind of technology used for Brooks Hyperion Tempo’s midsole, it has become somewhat lighter than Brooks Ghost.
Brooks Hyperion Tempo is using DNA FLASH. This is a nitrogen-infused midsole which gives a snappier feeling. If you want a faster run or run a lot of sprints, this midsole is for you.
It is more efficient with the use of the energy return and will help you to propel faster.
In contrast, the midsole of Brooks Ghost is made from DNA LOFT V2 foam. This is a soft and plush foam that will provide you with luxurious cushioning. However, as with any other running shoe, the moment you add cushioning, the responsiveness takes a hit.
This is same for Brooks Ghost as well. You will feel that dampening feeling when you are using this running shoe. This become very apparent when you switch from Brooks Hyperion Tempo to Brooks Ghost.
Apart from DNA LOFT V2, Brooks Ghost’s midsole also has Omega Flex Grooves. This improves the forefoot flexibility and doesn’t compromise cushioning. The Segmented Crash Pad flexes with your foot, providing you with a smooth heel-to-toe transition.
If you compare the rigidity of both of these midsoles, you will find that the Brooks Hyperion Tempo‘s midsole is more rigid than the Brooks Ghost. This is why it is able to provide you with such great energy return.
However, such soles are not great for super long distance running. It will be good for around 10K. Beyond that, your feet may start to ache.
On the other hand, Brooks Ghost is made for longer distance runs. You can even run marathons in them. It will provide you with a good level of cushioning throughout the run.
What is common with both of these cushioning is that they both adapt to your steps and will not disappoint you in that department.
Upper

The upper of Brooks Hyperion Tempo is made from a featherweight stretch woven mesh. It offers you with excellent fit and is great for breathability. Also, it will move with your feet, providing a restriction-free movement.
The print on the upper is also very nice. It starts as a set of parallel dots near your ankle and takes on the shape of parallel short lines like light pulses travelling through a screen. This gives it a stylish and upbeat look.
It also has an integrated pull tab and it minimizes the heel slippage.
While this running shoe is excellent in the looks department, it runs a bit narrow. Especially, if you have feet like me which have a big bunion, then you may have to rethink. Also, with such issues, the mesh of the upper tends to get torn easily, especially where the bunion is pressing against the mesh.
Also, it is available only in medium width for both men and women. So, the number of runners who can use these shoes is a bit less than that of Brooks Ghost.
The upper of Brooks Ghost is made up of engineered mesh. It provides you with excellent breathability and is very lightweight. However, in the looks department, with version 15 also, Brooks Ghost looks a bit old-school to me. But with this version also, Brooks Ghost has maintained its mark and has not disappointed.
Although it also suffers from the same problem of narrowness as Hyperion Tempo, it still provides you with different widths. Also, most of the runners who use Brooks Ghost, mention that the fit is just right.
Brooks Ghost has retained its heel counter from the last version and will not cause heel slippage. Also, both the shoes will not form blisters and don’t need breaking in.
Weight
In terms of weight, Brooks Hyperion Tempo is a bit lighter than Brooks Ghost.
Brooks Hyperion Tempo weighs around 7.1oz /201g for women and 7.3oz/207g for men.
Brooks Ghost weighs around 9.1oz/258g for women and 10.1oz/286.3g for women.
The difference in weight of these two shoes is not significant. However, one thing I observed is that the women’s version of Brooks Ghost has become slightly heavier than the last version. For the men’s version of Brooks Ghost, this difference doesn’t exist.
Overall, the difference in weight is not so much that it will interfere with your running or for that matter make you a faster runner.
Price
When Brooks Hyperion Tempo was launched, it was significantly more expensive than Brooks Ghost. The price difference was big and it was around $50.
Then Brooks kept on releasing newer versions of Brooks Ghost and has not released any new version of Hyperion Tempo.
Also, with every release, they started increasing the price of Brooks Ghost by a certain amount. So much so that it has become costlier than Hyperion Tempo.
However, when I checked the last time, Hyperion Tempo’s price had been slashed by Brooks. This makes me wonder, probably the new version of Hyperion Tempo is probably underway. This is just my opinion and not that of Brooks.
In the above sections, you will find all the relevant similarities and dissimilarities between Brooks Hyperion Tempo and Brooks Ghost.
However, there are few alternatives that are maybe excellent alternatives to these running shoes and you may want to include them in your research.
Below we have provided some of them. Do take a look if you are not in a hurry to pick your running shoe.
Similar Shoes
Running Shoes Similar To Brooks Hyperion Tempo
Brooks Hyperion Tempo is a neutral running shoe and is great for providing plush cushioning.
One running shoe that can match closely to these shoes is mentioned below.

- Fresh Foam midsole cushioning is precision engineered to deliver an ultra-cushioned, lightweight ride
- Bootie upper construction hugs your foot for a snug, supportive fit
- Synthetic/mesh upper
Last update on 2024-03-28 / Affiliate links / Images from Amazon Product Advertising API
Running Shoes Similar To Brooks Ghost 15
Brooks Ghost is a neutral running shoe with a decent amount of cushioning. It is lightweight, durable and will last for a good amount of time.
Keeping all these things in mind, we think the below-mentioned running shoe can be a viable alternative.

- For a Lighter, Softer Feel: Fresh Foam Beacon v3 lightweight running shoes have a soft and springy design that’s ideal for runners who want to move in all-around plush comfort
- Plush, Natural Ride: These running shoes are built for runners with Fresh Foam midsole cushioning that is precision-engineered to deliver an ultra-cushioned, lightweight ride with every stride
- Breathable Comfort: The engineered mesh on the uppers of these lightweight and breathable performance running shoes helps to provide cool comfort as your workouts heat up
Last update on 2024-03-28 / Affiliate links / Images from Amazon Product Advertising API
Conclusion
All the differences and similarities that we have come across are present in the above sections.
However, this by no means is a comprehensive comparison between Brooks Hyperion Tempo and Brooks Ghost and you should do some more research before you make any buying decision.
Both Brooks Hyperion Tempo and Brooks Ghost are good running shoes. However, due to the different types of cushioning, more lightweight and capable of tackling speed work and daily runs, we have selected Brooks Hyperion Tempo as our favourite.

Madhusree Basu
Author, Admin
Blogger and a fitness enthusiast. She loves running and Yoga and everything in between. She started running to manage her weight and to eat to her heart’s content. A true foodie at heart she shares whatever knowledge she has gained throughout the years about weight management and fitness.


![7 Best Women’s Running Shoes for Sesamoiditis Reviewed in [2022]](https://bestplaygear.com/wp-content/uploads/2019/04/best-womens-running-shoes-for-sesamoiditis-HI-min.jpg)


![Hoka Mach Vs Brooks Ghost: Which One Is The Best For You? [2022]](https://bestplaygear.com/wp-content/uploads/2022/07/Brooks-Ghost-Vs-Hoka-Mach-min.jpg)